How to set the preferred band for your Windows
To set the preferred band for your Windows computer, follow these steps:
Way 1 - Set the preferred band:
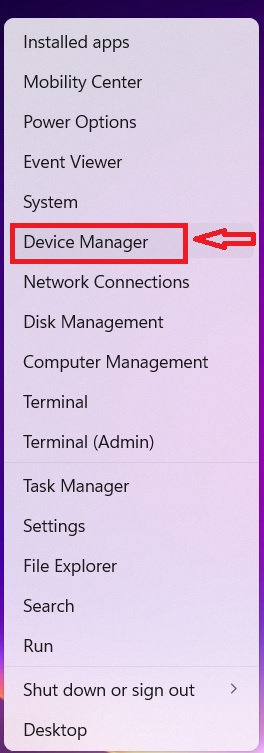
- Press the Windows key and "X" together.
- Select "Device Manager" from the menu that appears.
[caption id="attachment_786" align="aligncenter" width="264"]
 Select "Device Manager" from the menu that appears.[/caption]
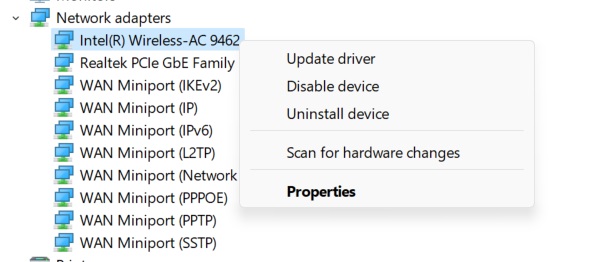
- In the Device Manager window, locate and expand the "Network adapters" category.
- Right-click on your primary WiFi card and select "Properties."
[caption id="attachment_787" align="aligncenter" width="593"]
 Right-click on your primary WiFi card and select "Properties[/caption]
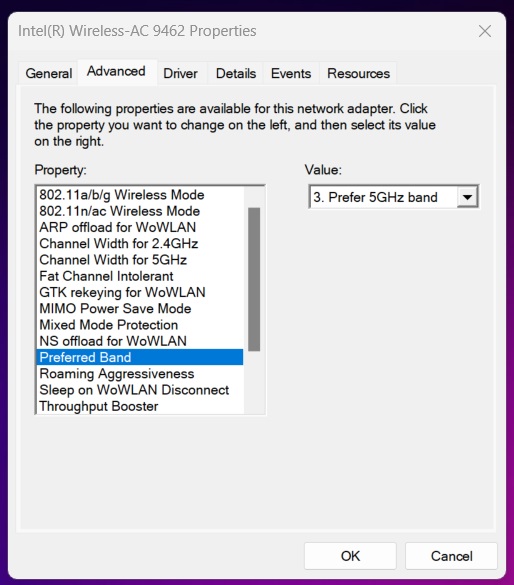
- Go to the "Advanced" tab.
- Look for an option like "Preferred Band" or "Bandwidth" in the left pane and select it.
- Set the value to "Prefer 5 GHz Band" from the drop-down list.
- Click "OK" to save the changes.
[caption id="attachment_789" align="aligncenter" width="514"]
 Set the value to "Prefer 5 GHz Band" from the drop-down list[/caption]
This way, you can set the 5 GHz bandwidth for your device. Now, connect to a 5 GHz WiFi router to take full advantage of the dual-band WiFi.
Way 2 - Change the Wireless Value: If you don't see the Preferred Bandwidth option in the network adapter settings, you can still achieve the same result by tweaking the Wireless Mode.
- Press the Windows key and "X" simultaneously.
- Open the Device Manager.
- Find and expand the "Network adapters" category.
- Identify the WiFi card you are using, right-click on it, and select "Properties."
- Switch to the "Advanced" tab.
- Choose the "Wireless Mode" from the left pane.
- Set the value mode to "IEEE 802.11a" or "802.11ac".
- Note: If you don't see these options, it means your WiFi card doesn't support the 5 GHz band.
- Click "OK" to save the changes.
After setting your network card to use the 5 GHz bandwidth, you can connect to a dual-band router and enjoy the benefits of the higher frequency.
No comments:
Post a Comment