How to Fix Printer Offline In Windows 11
If you need a hard copy of any document you give it a print using the printer. But sometimes printers do fail to respond, that is the print process does not respond and you do not get a print of the document. This might be due to a network issue, or most of the time the printer might be offline. In the worst case, you may need to reinstall the printer. In this article, we have a few methods to bring back the printer to online mode and solve the print issue
- Check whether your printer is turned on and also make sure it is connected to the same wi-fi network on which your other devices are connected.
- Restart your printer – Turn off your printer and unplug its cable. Wait for a few seconds and then plug in the printer cable. Now turn on the printer and then check.
- Restart the PC – Also it may be due to some glitch in the network so try restarting your computer as well.
Method 1: Make Sure Not To Enable Use Printer Offline Mode
Step 1: Open the windows settings using Windows + I keys together
Step 2: Click on devices
Step 3: On the left click on printers & scanners
Step 4: At the right, select the printer that you want to check
Step 5: Click on Open queue
Step 6: In the opened window, click on printer that is at the top
Step 7: From the appeared list, make sure Use Printer Offline option is disabled.
Method 2: Clear The Print Queue
Step 1: Open the windows settings using Windows + I keys together
Step 2: Click on devices
Step 3: On the left click on printers & scanners
Step 4: At the right, select the printer that you want to check
Step 5: Click on Open queue
Step 6: In the opened window, under document name select the documents and click on cancel
Method 3: Restart The Print Spooler Service
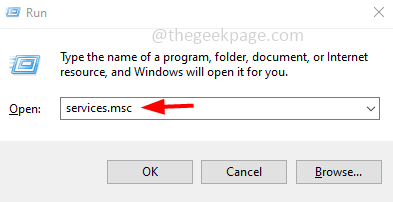
Step 1: Open the run prompt using Windows + R keys together
Step 2: Type services.msc in the run prompt and hit enter. This will open the services window
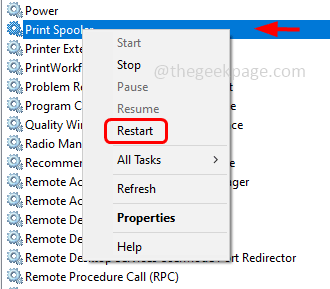
Step 3: Scroll down and find Print Spooler service
Step 4: Right click on it and click on restart. Then check if it is working fine.
Method 4: Set The Printer To Online Manually
Step 1: If the printer is set to offline, then set it to online manually
Step 2: To do that, open the windows settings using Windows + I keys together
Step 3: Click on devices
Step 4: On the left click on printers & scanners
Step 5: At the right, select the printer that you want to check
Step 6: Click on Open queue
Step 7: In the opened window, click on printer that is at the top
Step 8: From the appeared list, select Use printer online.
Method 5: Remove and re-install your printer
Remove the printer
Step 1: Open the windows settings using Windows + I keys together
Step 2: Click on devices
Step 3: On the left click on printers & scanners
Step 4: Select the printer that is troublesome and click on remove device button
Step 5: In the confirmation click on yes.
Reinstall the printer
Step 6: Open the windows settings using Windows + I keys together
Step 7: Click on devices
Step 8: On the left click on printers & scanners
Step 9: Ensure that your printer is on and connected
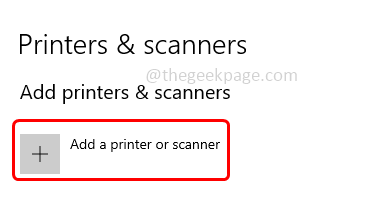
Step 10: Click on add a printer or scanner
Step 11: Select your printer and follow the on screen instructions to add the printer. Once the printer is installed, check if the problem is solved.
That’s it! I hope the above information is useful. Thank you!!


No comments:
Post a Comment